import { Meta } from "@storybook/addon-docs/blocks";
import labels from "./labels.json";
# Working with Github

## 1. Set up Github account
StorefrontUI is a Github repository. You will need to [have Github account](https://github.com/signup/free) in order to start contributing to our project.
## 2. Fork StorefrontUI Repository
Forking a repository will copy the current state (**at the moment of forking**) into your Github account's respository list. During contributing to StorefrontUI, this is **required** for you to keep track your issue branches and code.
Forked repository is **not** updated automatically when the original one changes, you will need to
keep it updated manually once in a while.
By default this will clone the repo into `storefront-ui` folder in the current directory. If you wish to define a different folder name, you can pass the desired name as an optional parameter in the clone command.
```bash
$ git clone git@github.com:username/storefront-ui.git
```
#### Using HTTPS:
In the same popover after clicking on the green button, click on `Use HTTPS` link on the top right corner.
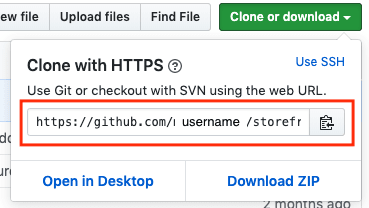
The HTTPS link will be available for copying in the following format:
```
https://github.com/username/storefront-ui.git
```
The next steps to clone into local machine are **the same** as above, with the HTTPS link in place of the SSH one.
More information: [https://help.github.com/en/articles/fork-a-repo](https://help.github.com/en/articles/fork-a-repo)
### Keep your forked repo updated
All the code fixes and new features for StorefrontUI will be merged into the main repository. Hence, to keep your forked repo updated, you can:
#### Manual update with `fetch`
Simply run this command on the terminal within the folder containing the code of your forked repo:
```bash
git fetch git@github.com:DivanteLtd/storefront-ui.git
```
This is simple solution without any setting required. However, in many cases, the second method is **preferable**.
#### Set the original repository as a second remote origin.
- **Remote origins:**
See what remote origins you currently have locally, run the following command in the terminal:
```bash
git remote -v
```
This should show your cloned repo as the original remote:
```bash
origin git@github.com:username/storefront-ui.git (fetch)
origin git@github.com:username/storefront-ui.git (push)
```
- **Adding upstream origin:**
We will add the original repository as another upstream remote by:
```bash
git remote add upstream git@github.com:DivanteLtd/storefront-ui.git
```
That's it! Running the command `git remote --v` will now yield:
```bash
origin git@github.com:username/storefront-ui.git (fetch)
origin git@github.com:username/storefront-ui.git (push)
upstream git@github.com:DivanteLtd/storefront-ui.git (fetch)
upstream git@github.com:DivanteLtd/storefront-ui.git (push)
```
- **Sync with the main repo:**
To fetch the latest from the main repo to your `master` branch, you can run:
```bash
git fetch upstream master
```
More information: [https://help.github.com/en/articles/syncing-a-fork](https://help.github.com/en/articles/syncing-a-fork)
## 3. Select a Github issue
We know it's not easy to pick an issue that is most suitable to you to work with, especially when it comes to first-timer. Thus we came up with labelling system to help addressing this problem.
### Select issue by its label
Below are the main labels which are grouped by:
#### Difficulty level
{labels
.filter((label) => label.type === "difficulty")
.map((label, index) => (
{label.name}
{label.description}
))}
We recommend first-time contributor to select issues with label `Good first issue` to start. But it's entirely up to you.
ANY TROUBLE?
Feeling some issue's level does not match the label assigned? Drop us a message in Discord or leave a comment inside the issue.
#### Type of the issue
{labels
.filter((label) => label.type === "issue")
.map((label, index) => (
{label.name}
{label.description}
))}
#### Status of the issue
{labels
.filter((label) => label.type === "status")
.map((label, index) => (
{label.name}
{label.description}
))}
You can review the **full list** of labels and the issues attached to them [on our Github labels](https://github.com/DivanteLtd/storefront-ui/labels)
**General labeling rules**
To avoid over-labeling, please stick to them.
**1.** `Bugs` shouldn’t have difficulty label - you never know how hard/how many days solving this issue will take.
**2.** All `features` should have difficulty level.
**3.** `Design` label should go alone without any additional labels.
**Notes**:
- You can **filter** our Github issues according to a specific labels by clicking at column `Labels` and selecting the desired label from the dropdown list.

- Make sure that issue is **not** assigned to any other contributor by checking the `Assignee` column is empty.
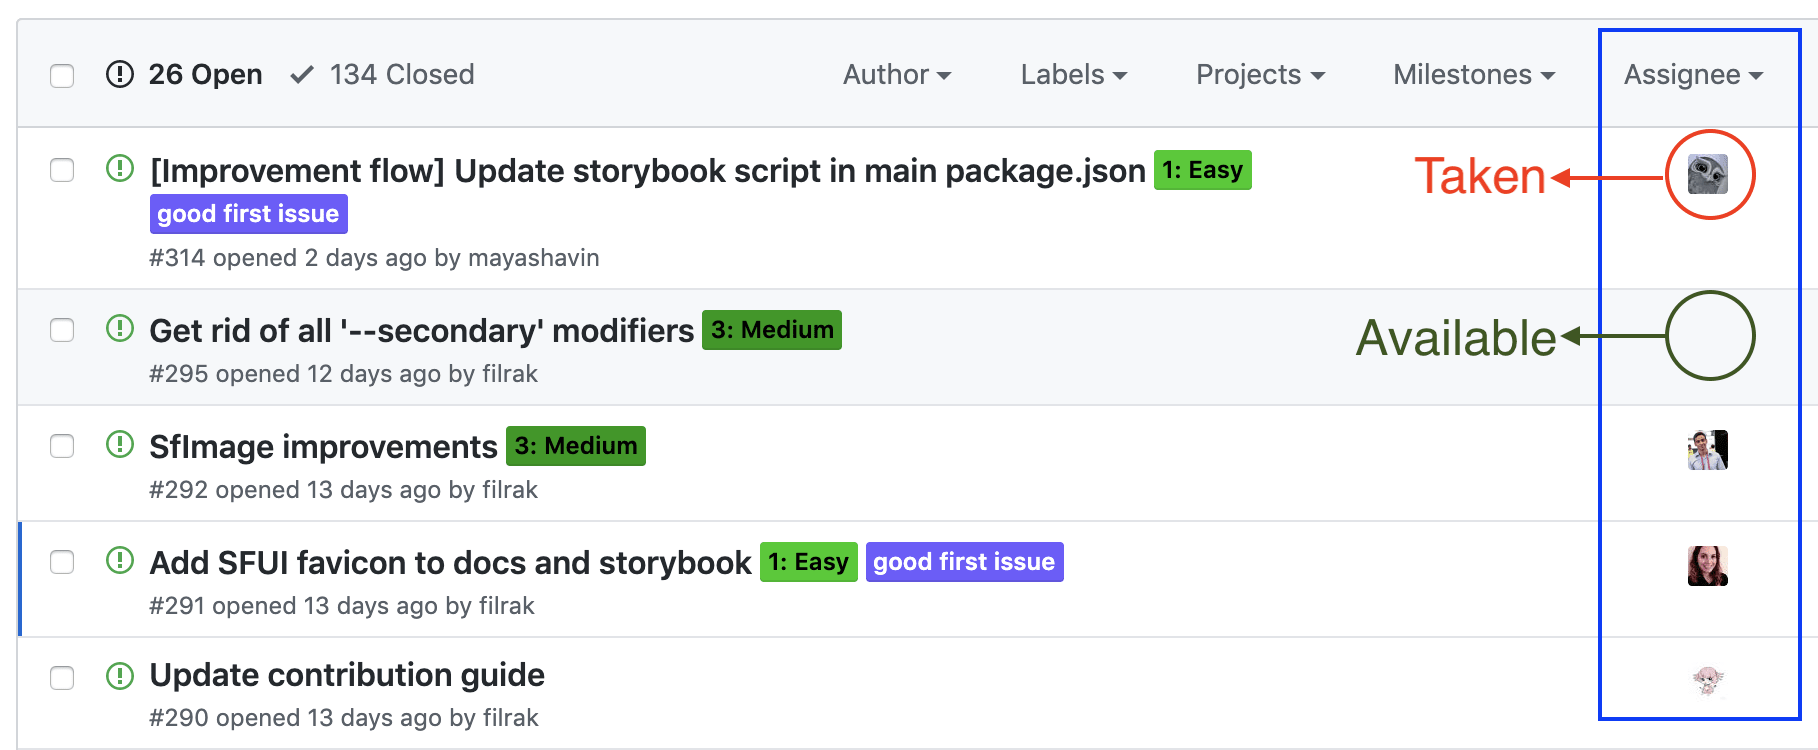
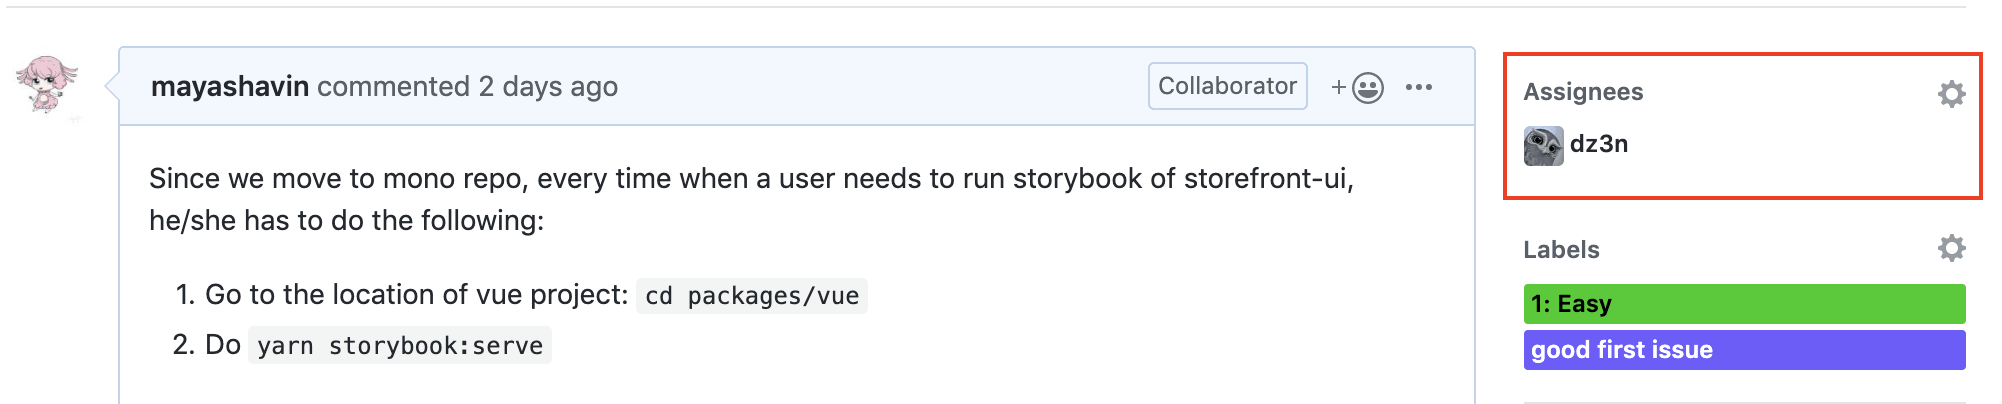
or by checking the `Assignee section` on the right side inside the issue page.
### Get assigned to selected issue
Once you found the issue you want to work and it's not yet assigned, let's get it assigned to you properly.
#### First time contribute to our codebase
If this is your first time in StorefrontUI codebase, you need to either:
- **make a comment** inside the issue page. In that comment, tag anyone in [our core team] by typing `@` and ask to be assigned.
or
- **copy the link** to the issue and \*\*drop it" inside [Discord server - #contributors](https://discord.gg/GS8hqFS) with a note that you'd like to take it.
And we will make sure it happen.
#### Contributed to our codebase before
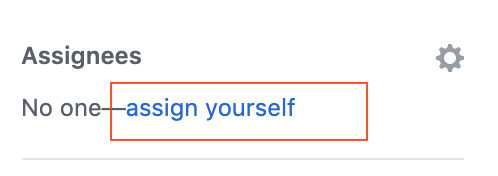
It'll be extremely easy. Inside the issue page, simply click on `assign yourself` in `Assignee section`, and 🎉you are assigned!
## 4. Create an issue branch
Now that you are assigned to an issue, it's time to get to work :smile:
We **strongly** recommend you to **create a new branch** from your `develop` branch instead of working directly on the `develop` branch of your **forked**.
This allows you to work on different issues, with each of them attached to a specific branch. Keeping your `develop` clean and synced with `develop` of StorefrontUI ensures you **will always have a clean state** to start working on new or fallback to when needed.
**Read more about branching and merging guidelines flow here [Branching Guidelines](?path=/story/introduction-contributing-guide-branching-guidelines--page)**
NAME YOUR BRANCH
We suggest naming your branch according to the following format:
```
#
-
```
For example: `#290-contribution-guide`, and description of the issue **should not more than 5 words**.
There are lots of way to create a local branch, below are two most common ways:
### Using terminal (or command line for Windows)
- **Navigate** to your folder cloned from your forked repo.
VERIFY YOUR CURRENT BRANCH
You should verify that your current branch is master before continuing, to avoid including unlated changes for different issue branch. It can be done using:
```bash
git status
```
- **Run** the command:
```bash
$ git checkout -b
```
in which, `-b` is the flag indicating it's a command to create a new branch.
BE CAREFUL
git checkout branch-name without a flag will simply just{" "}
switch to an existing brand-name branch
- **Setup remote** branch and **attach** local branch to that remote branch
```bash
git branch --set-upstream origin/
```
### Using Visual Studio Code (VS Code)
The good news is VS Code has Git support built-in.
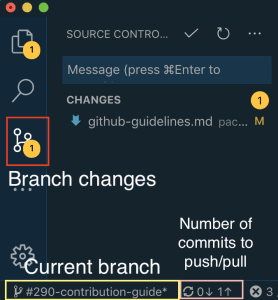
#### Create branches
- It can be done easily by clicking the **bottom left corner** of VS Code, where the current Github local branch is shown.
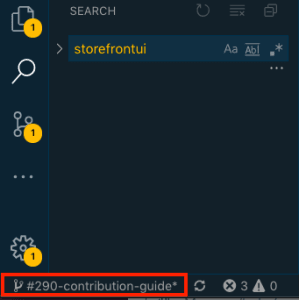
- A new input dropdown will be opened at **the top** of VS Code with an input field for branch name and several options for selecting. After **typing the new branch name** and select whether to branch out from current branch (_first option_) or from a different branch (_second option_), a local branch will be created.

SWITCH TO ANOTHER BRANCH
There is autocomplete enabled for this branch name input field. You
can also check out (switch to) another existing branch by do
exact the same and select the matched branch shown in the dropdown
instead of the above options.
DO NOT FORGET
Click on the cloud icon at the bottom, next to the branch name to set the remote branch and have it tied to the local one.

In addition, it allows you to do other basic features, such as:
- Initialize a repository.
- Clone a repository.
- Create tags.
- Stage and commit changes.
- Push/pull/sync with a remote branch.
- Resolve merge conflicts.
- **View differences** made.
## 5. Create PR from branch
### Make a commit and push to remote branch
1. You have **maximum 50 characters** for a commit message. Be concise!
2. Make sure your issue number will be presented in one of the commits and [follow the guide to enable auto-closing the referenced issue after your PR is merged](#close-issue-through-commit-message).
3. Make sure your commit follows our [**Conventional commits guidelines**](?path=/story/introduction-contributing-guide-branching-guidelines--page#conventional-commits).
### By terminal (or command line for Windows users)
- Use the following command to **stage** a **single** changed file:
```bash
git add
```
Or **all** the changed files for a commit by using `-a` flag:
```bash
git add -a
```
- **Create a commit** with a **meaningful** message by using `-m` flag:
```bash
git commit -m
```
You can also combine staging all files and writing a commit message into **one** command with two flags `-a` and `-m`:
```bash
git commit -a -m
```
- **Push** that commit to remote branch
```bash
git push
//OR
git push origin
```
STAGE THE WRONG FILE?
If there is a staged file that wasn't supposed to be staged in the commit,
you can unstage it by using checkout command. See{" "}
Troubleshootings - Unstage unwanted file(s)
{" "}
for more information.
#### By VSCode UI
While working in local branch, your changes will be reflected on the left side column of VSCode (after selecting Github plugin  icon).
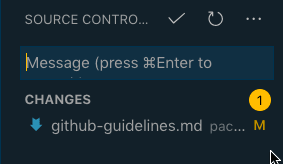
- **Enter** a **meaningful** commit message in the `Message` field.
- You can **select specific changes** to stage by hovering on the changed file and click on `+` icon.
Or **select all** by hovering at the `CHANGES` tab and click on `+` icon.
- **Commit** the selected changes to the branch by clicking on the  icon at the top.
Click on that icon **without** pre-selecting changes will **auto commit all** the changes listed.
- Once done, **push that commit** to the **remote** branch by clicking the sync area at the bottom left of VSCode, next to the branch name.
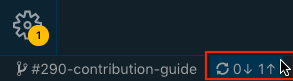
Confirm the action and here we go, the commit will be synced.
### Sync branch with `develop`
Syncing with `develop` is simple, and we **strongly** suggest to do it frequently to avoid conflicts.
After you set up [synchronization between your forked repo and StorefrontUI repo](#keep-your-forked-repo-updated) and have your `develop` branch up-to-date, simply use `git merge` to **merge** the latest `develop` changes into your branch.
```bash
git merge develop
```
You can also use `git merge ` to merge changes of another branch into your branch.
If the merge is done **without** conflict, terminal may switch to [vim](http://www.vim.org/) editor with a basic information about the merge as a commit. If so, you can start editing it by hitting `i` key.
Once done, hit `ESC` key and type `:wq` to save (`-w`) and quit the editor (`-q`).
Then **push to the remote branch** using `git push` command mentioned in the previous section.
### Create Pull Request (PR)
Always propose a Pull Request against **develop** branch
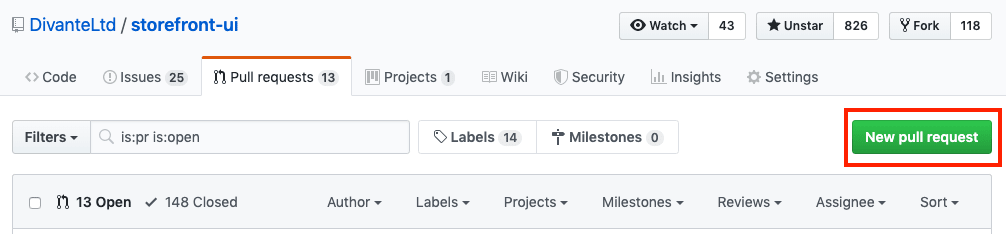
- Navigate to [**Pull Requests Tab**]() in StorefrontUI repo and click on "New pull request" button (located on the right side)
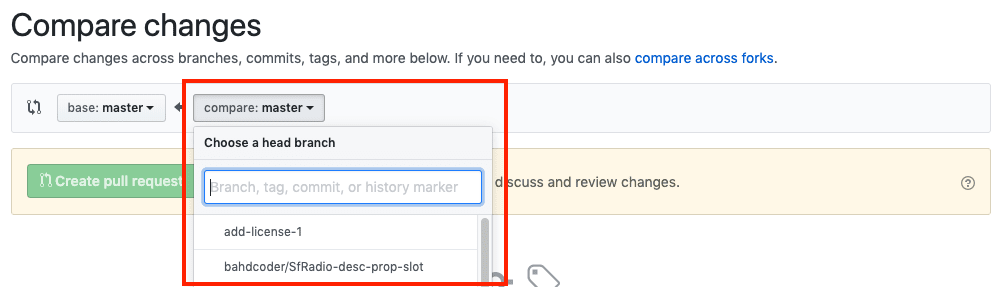
- **Search** for your branch name and select from the dropdown
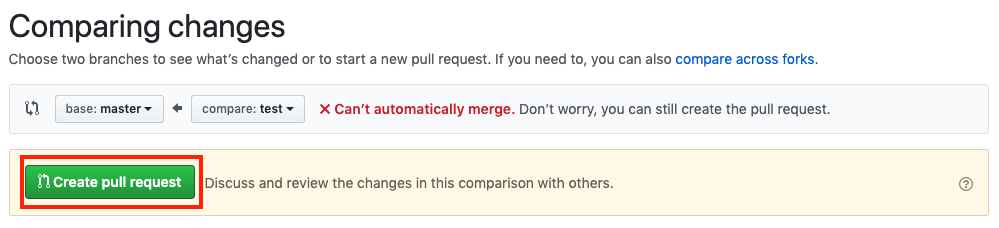
- **Review** your changes (files comparison are available by scrolling the page down) and **confirm** by clicking on `Create pull request` button
- **Fill in** the following details before submitting the Pull Request:
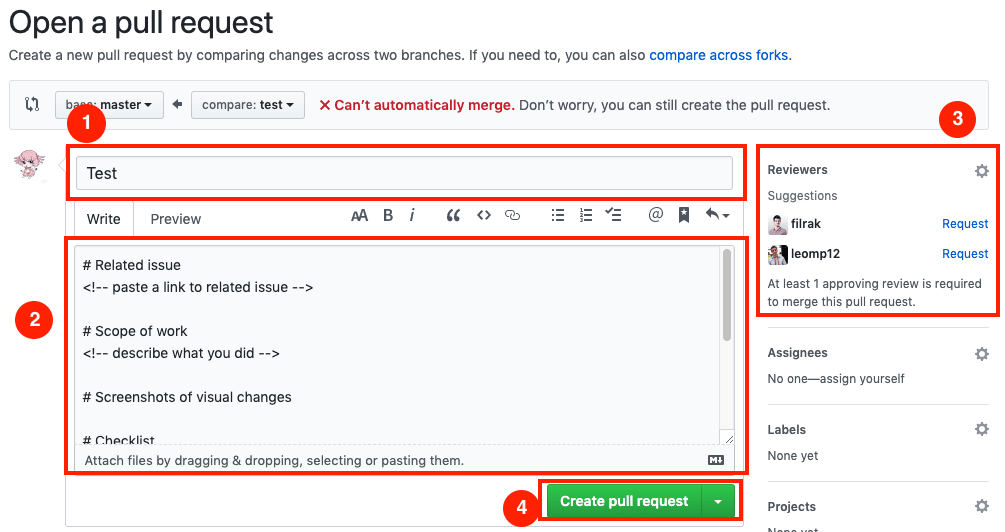
1. Write the **title** of your pull request in the following format:
```
#[Issue-number] - [Issue title]
```
WORK-IN-PROGRESS PR
You can also create pull request while working on an issue, just remember to
add [WIP] at the beginning of the issue title. This will let us
know not to review it until it's ready.
2. Write the issue **description** according to our template.
3. **Add a reviewer** to review your PR by searching for their Github account or selecting from the suggestion list. This will send the assigned reviewer(s) a notification on every changes made to the PR hereafter, as well as to start reviewing.
There can be multiple reviewers assigned to one PR, depending on how complex that PR is and how many reviewers you would like to review your Pull Request. But **minimum one is required**.
4. **Confirm** create the pull request.
### Code review
Make sure your code follows our [**Coding guidelines**](?path=/story/introduction-contributing-guide-code-guidelines--page).
After the pull request is created and assigned, the selected reviewer(s) will go over the changes, whether it's code or documentation fixes. They will leave the comments at the relevant area if needed to:
- Request for a code change.
- Ask a question.
This step is required to ensure the consistency in coding standards, readability and avoid unseen bug(s) that may occur along the way from a fresher look.
Once it's done and approved, one of our core team members will merge it to master and that's it! Congratulations, you just make a contribution :tada: !
## Troubleshootings (FAQs and tips)
### Close issue through commit message
You can trigger closing the issue automatically once the PR (Pull Request) is merged to master. All you need to do is to ensure there will be a commit with message in the following format:
```
Fixes
```
There other possible keywords are `fixes`, `fix`, `closes`, `close`, etc.
More information:
- [https://github.blog/2013-01-22-closing-issues-via-commit-messages/](https://github.blog/2013-01-22-closing-issues-via-commit-messages/)
- [Closing issues using keywords](https://help.github.com/en/articles/closing-issues-using-keywords)
### Rename a branch locally and remotely
To rename your branch and make sure your repo is synced, only two steps are required:
- **Rename locally** by using
```bash
git branch -m
```
in which, `-m` flag stands for `--move` command.
BE CAREFUL
A capitalized -M flag will indicate --move with{" "}
--force flag enabled to "force" the change". This will allow
you to rename even if the name already exists in your repository.
If you want to rename the branch that is currently checked out, just omit the `` option, which looks like this:
```bash
git branch -m
```
- **Rename remotely**
Once the local branch has been renamed, just run the below command:
```bash
git push origin :
```
Behind the back, it actually does the followings:
- **Delete the remote branch** that is to be renamed
- **Push** the new branch to the remote repo
- **Switch** to the new branch
- **Reset the upstream** reference for the renamed branch
### Unstage unwanted file(s)
Use `reset` command to:
- Removed a **single staged file** from the staging area
```bash
git reset HEAD --
```
- Removed **whole directory** from the staging area
```bash
git reset HEAD --
```
This **must** be done **before** you make a commit.
More information: [Git reset Manual](https://git-scm.com/docs/git-reset)
### Undo file(s) changes
Use `checkout --` command to undo your changes on a **single** file or on **all files in a single directory**:
```bash
git checkout --
```
Or **all** the files
```bash
git checkout -- .
```
This **must** be done **before** you make a commit.
More information: [Git checkout Manual](https://git-scm.com/docs/git-checkout)
### FAQs
TBD